The Mission:

I am building an airplane. I really can't tell you how weird it sounds to me to hear those words in my head as I type. I am keeping this blog as an adjunct to my written log, which is required to comply with FAA requirements for Experimental Aircraft construction. My son Doug is my partner in this project. There are two goals: to build the best, safest, and yes, COOLEST, airplane we can, and to allow Doug to acquire some truly awesome experiences, not to mention building skills. Thanks for viewing.


How to use this blog

The most current post is displayed on this opening page. To access the older posts, click on the "Blog Archive" on the right hand side. The drop down menu is arranged by the month and lists the posts, by title and by date posted, in reverse chronological order.

I will arrange the hypertext links to other websites I find interesting better some day, but they are at the bottom.

If you navigate to my first post, there is a link to my luthiery pages. I miss working with wood. Aluminum is nice, but it's boring. Give me a highly figured maple any day!

Sunday, February 27, 2011

More progress on the wings

I had a visit from my EAA technical counselor, Wally Anderson.  He did find a "few" things for me to do.  I am waiting now on the roll servos for the wings before I finish riveting the bottom skins on the left wing.  I trialed the wingtip nav and strobe lights and the HID landing lights with a 12 volt battery. They worked well. It was impressive to see the intensity of the LEDs on the strobe/nav lights.  I have also wired in the pitot, but I haven't bench tested it for heating yet.

The right wing is coming along quickly, and we will be moving the completed wings out to the hangar soon.  I'll have to move a fair bit of the tools from my garage temporarily out to the hangar.

I ordered my engine and exhaust system.  I will be using an IO-360, a fuel injected, horizontal inducted  beast from Aerosport in Canada and a Vetterman four pipe exhaust.  The engine and the finish kit from Van's (slider canopy, motor mount and main gear) arrive in mid April.  Doug and I have our work cut out for us from now until then.


Flaps and aileron on the left wing

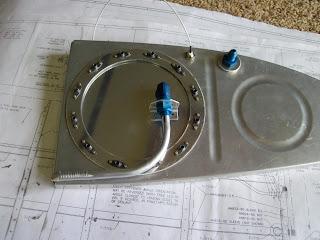
Fitting the anti-rotation bracket on the fuel pickup; right tank

Riveted the right tank stiffeners and sump with Proseal

Right tank sump installed

Right tank filler installed

Right tank standard fuel inlet tube

Saturday, February 19, 2011

"Adel" clamps

I had to find a way to run the cable from the HID lamp I'm using in the leading edge for a landing light to it's ballast, which I mounted on a rib near the most outboard access panel.  To run the cable meant either cutting it, then running it through grommets, then splicing the two ends together, or else finding a way to run the cable without cutting off the factory installed terminals.  I chose the second way.  I used little open grommets referred to as MS21919 clamps or "adel" clamps.  In order to attach them to the ribs, I used an idea I saw on the VAF web site, and made little brackets out of aluminum angle stock.


Angle stock on left. Brackets on bottom

Detail of aileron push rods

Completed brackets with nut plate riveted on for AN4 bolt

Cable run from ballast (same bay as Pitot)


View of Adel clamps and brackets on ribs

Monday, February 14, 2011

St. Valentine's Day

My wife had the opportunity to go on a limo driven wine tasting tour this weekend.  Here is a shot of the group having just completed tastings at four or five of our local, wonderful wineries, including Sweet Cheeks (the group's favorite), Chateau Lorane and King Estate.  This gave me cover to spend the day with Doug in the garage.  We made good use of the time, and good progress.


Cute blond, far right, is my valentine

FAR required occasional shot of me actually doing work

Requisite Doug interesting angle photo

The current state of the garage

Essentially completed left wing in foreground; right wing in back

Needs a few rivets, then install aileron and flap

Right wing

Skin added, plus leading edge

Friday, February 11, 2011

On to the right wing

Well, we finally got to the completion point on the left wing where we could take it down off the construction jig and lay it on a table for the final internal components.  The pitot wires and tubing are in, the wires are in, the ballast for the HID landing lights is in, the stall warner, and the control rods to the aileron.  We will finish riveting on the bottom skins and then move the left wing to the hangar to mate with the fuselage.  Now we start again on the right wing, BUT most of the sub-assemblies are actually done, so hopefully progress on the right wing should go even faster than the left.

At this point, out time in the garage seems to be dwindling.  Because of the size of the fuselage, especially after the wings get attached, we are constrained to finish at the hangar.

Aileron hinge assembly


Starting the right main spar

Flap fairing

Aileron hinge installed on rear spar, left wing

Aileron fairing


Sunday, February 6, 2011

Major progress

We now have a hangar! Fittingly, it's number 7 at Mahlon Sweet airport in Eugene

And the Quick Build fuselage (by Synergy Air) is done and delivered

So Doug and I built a stand (on wheels) to elevate it and hold it in neutral position

Meanwhile, back at the garage, the right fuel tank is clecoed

Also the strap underlying the right leading edge and fuel tank is getting done (in background is the left flap)

And the left wing is almost skinned.   Just a few more rivets!

We also have the pitot tube attached and plumbed, the wires for the lights, stall warner, capacitance senders, and pitot heat. Not installed yet: servo wires or AOA installation (coming soon).  It has been a busy time in the last week or so.  The biggest news, I guess, is that Doug is now working very part time at Synergy Air in Eugene.  The good news is that he is getting incredibly valuable insights working with the best RV builder's assist program there is.  The bad news is I don't have him as often in the garage anymore!